Music Streaming With Volumio and Raspberry Pi
Instructions on building your own Spotify streamer
I wanted a device that could stream audio from a media server like Plex, not be reliant on Bluetooth for connectivity, allow me to use my existing speakers, and provide high quality audio output. I also wanted a solution that didn’t have me vendor-locked, like using Chromecast Audio or Amazon Echo. This left little options, other than buying a very nice wireless DAC or similar device.
About nine months ago it occurred to me that I could build what I wanted, far cheaper than most solutions. It would also prove to be a fun project and stretch some of my knowledge of audiophile equipment.
The Idea
What I settled on was building a small Raspberry Pi with a DAC board built into it. This gave me the flexibility to run whatever operating system I wanted, access GPIO (general-purpose input/output) pins for additional capabilities, and a large equipment ecosystem that allowed me to pick what I wanted. I found an audiophile headless operating system named Volumio (https://volumio.org/), capable of providing all of the headless media streaming options I wanted.
Parts List
DAC Board
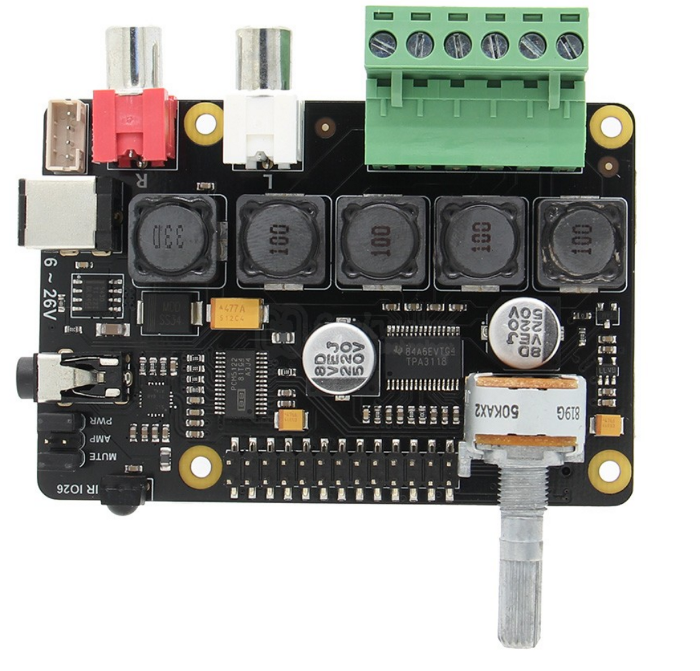
After some cursory research on Raspberry Pi DACs, I came across the X400 V3.0 DAC+AMP Audio Expansion board. Some of the features on this board include:
- 32-bit/384kHz quality DAC
- Large volume knob for external control
- IR receiver for use with a remote control
- RCA left/right outputs
- 3.5mm audio jack
- Terminal block (I still call it a Phoenix connector) for speaker wire connections
- Separate power input, capable of powering both the X400 V3.0 board and the Raspberry Pi board.
Amazon Link: https://www.amazon.com/gp/product/B07MKMD5PZ
Cost: $37.99 USD
Case
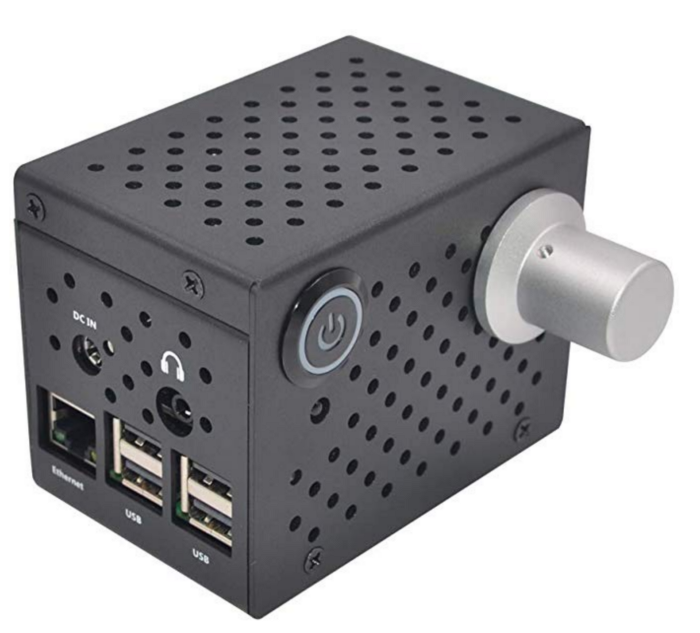
The company “WINGONEER” provides a perfectly good case for the X400 V3.0 DAC+AMP board. While it’s not exactly my top choice in a case design, it provides parts like a large volume knob and a power button.
Amazon Link (Raspberry PI 3 B+ and lower): https://www.amazon.com/gp/product/B07M9TH4B5
Geekworm + Board Link (Raspberry Pi 4 compatible): https://geekworm.com/products/raspberry-pi-4-x400-dac-amp-audio-board-case-embedded-heatsink
Cost: $23.99-$74.89 USD (depending on configuration)
Power
When choosing a power supply, ensure it provides enough amperage
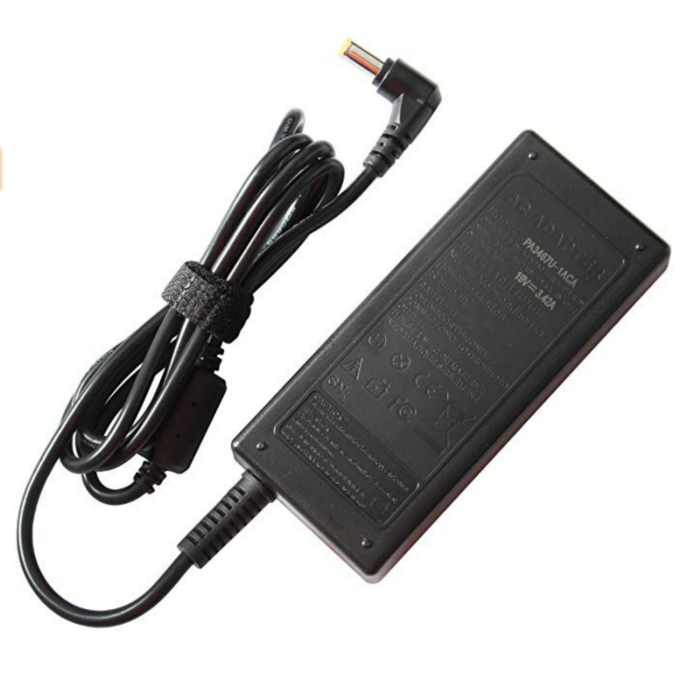
I went with what’s arguably an overpowered solution for my power supply, but past experience with Raspberry Pi’s and cheap power supplies has me erring on the side of “enough, constant power” versus “just enough” power. The X400 V3.0 DAC+AMP board requires a power supply capable of providing 6–26 Volts DC, with >=3 Amps recommended. I chose a power supply that provides 19 Volts DC and 3.42 Amps, more than sufficient to power both the DAC and Raspberry Pi.
Amazon Link: https://www.amazon.com/gp/product/B014IU1GSC
Cost: $11.49 USD
Raspberry Pi
When I built this streamer, the Raspberry Pi 4 was just released, with support for the X400 V3.0 DAC not stated anywhere. Most Raspberry Pi boards are overpowered for what we need to provide for the DAC hardware and supporting OS, so I was not worried about using a Raspberry Pi 3 B+ instead of the Raspberry Pi 4 inside my streamer. Given that the cost of the Raspberry Pi 3 B+ has come down, I will still recommend it as the best option for this build.
Amazon Link (Raspberry Pi 3 B+): https://www.amazon.com/gp/product/B07BDR5PDW
Cost: $35–50 USD (Availability influences cost)
SD Card
You will need a minimum of 4GB capacity, though 8GB is preferred. Given the cost of SD cards these days (< $10 USD for 32GB), I would suggest getting the larger capacity so you can store some local media or reuse the card if you have different plans in the future. If you want to play media locally from the Raspberry Pi, get the largest SD card you feel comfortable purchasing.
Amazon Link: https://www.amazon.com/Samsung-MicroSDHC-Adapter-MB-ME32GA-AM/dp/B06XWN9Q99
Cost: $7.99 USD
##Setup and Configuration
Assembly
Geekworm has a great visual instruction guide on how to assemble the DAC, Raspberry Pi, and fitting them into the metal case. While I could make my own steps, I’d rather link to their site for the guide.
One important assembly note is that you want to remove the `PWR` jumper from the DAC board before connecting an external power supply. The DAC power supply, as mentioned earlier, will power both the DAC board AND the Raspberry Pi. If you don’t remove the jumper, the power button will not work.
Geekworm Instructions: https://geekworm.com/blogs/news/new-updated-raspberry-pi-x400-v3-0-dac-amp-expansion-board
Volumio Installation & Configuration
- Download the Raspbery Pi Volumio image from https://volumio.org/get-started/
- Using software like balenaEtcher or `dd`, write the downloaded image to an available SD card.
- Insert the SD card into the Raspberry Pi and power it on.
- The initial boot will take a few minutes (up to 6 minutes)
- Future boot times will not take nearly as long
- Volumio will start a wireless hotspot when it’s unable to connect to a network. Search for the network `Volumio`, using `volumio2` as a password.
- If you have Ethernet plugged in, you will need to find the IP address of your Volumio
- Once connected, access the Volumio interface at http://volumio.local or via IP address at 192.168.211.1.
- The initial connection to the web interface presents you with configuration options, such as choosing a default language, naming your Volumio, and specifying which output device you prefer.
- When presented the option for `Output`, move the slider to `Yes` for the question `I have an I2S DAC`
- Select `ST400 DAC` as the DAC option
- Once setup, you will be able to install plugins like Spotify or disable features like Bluetooth.
Specifying DAC Output in Volumio
- If not already connected, boot the Raspberry Pi and connect to it via the web interface address `volumio.local`
- Once logged in, go to `Settings` and select `General Playback Options`
- For `Audio Output` select `ST400 DAC`
- Volumio should prompt to restart. Once restarted, you should be able to use the
Remote Spotify Streamer
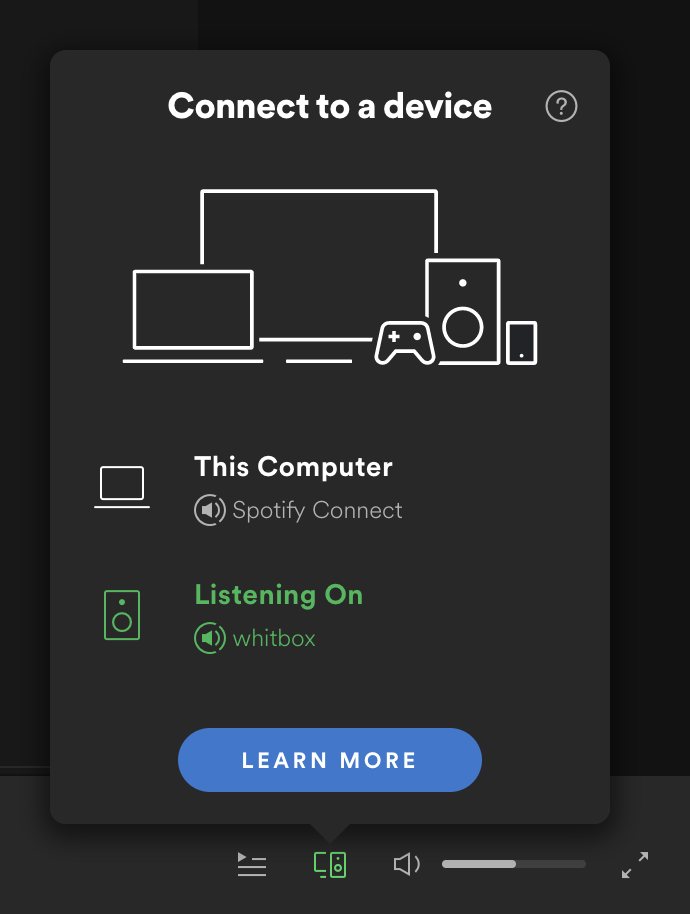
I mostly use my Volumio Raspberry Pi as a remote Spotify streamer for a Marshall speaker in my office. To enable this feature, install the Spotify plugin via the `Plugins` menu option. Once installed and enabled, you can select your Volumio streamer in from the `Devices Available` options. The volume slider in Spotify will control the audio on the Volumio streamer. I personally set the audio where I need it and leave it alone, stopping audio playback when I need the room audio to be quiet.
Problems Encountered
I ran an over-the-air (OTA) Volumio update that caused my volume adjustment to stop working. I tried updating again and it still didn’t work. After some investigation, I found that the `Audio Output` setting in `General Playback Settings` was set for `IQaudIO DAC`. I can’t recall if I had set it originally as `IQaudIO DAC`, but I changed it to `ST400 DAC`, which fixed the issue.
The power button that came with the X400 V3.0 DAC metal case is incredibly bright. It illuminates my office at night without additional lights present. I’ll admit that I’ve thrown my stuffed “This is Fine” dog in front of it a number of times to block the light over the last year. I need to either disable the light permanently or add a resistor to drop the output. While it’s annoying, I still haven’t been moved to actually deal with it.
Thoughts and Improvements
I wish I had performed more research into the DAC market before jumping into this project. I wasn’t familiar with Raspberry Pi compatible DAC boards when I had finally settled on the X400 V3.0 DAC. The features I needed are present in the DAC board I chose, but I could have been more informed about the types of board components. Knowing if I wanted a TI PCM5122 Burr Brown DAC, instead of an entirely different DAC, would have made me feel more confident. Ultimately I am happy with the decision I made and I think it sounds great.